

Hazardous Area Lighting Checklist: 6 Steps Before You Order
When a hazardous area lighting project goes wrong, the fitting is almost never the part that failed — the specification is. A Zone 2 light ordered for a Zone 1 area. An IP65 fitting washed down with a hose. A certificate that exists but doesn't match the model. All of these are decided before the purchase order is signed, which is why this checklist exists: six steps to run in order, each with the question to answer and the evidence to collect. Print it, run it, and the order takes care of itself.
Step 1: Confirm the Area Classification
Everything downstream depends on one document: the area classification drawing (or hazardous area dossier). It tells you the zone (0, 1, 2 for gas; 20, 21, 22 for dust), the gas group (IIA, IIB, IIC) and the temperature class required (T1–T6) for each area.
| Confirm | Question to ask | If the answer is "we're not sure" |
|---|---|---|
| Zone | Is this area Zone 1 or Zone 2? Who drew the classification? | Stop. Specify for the more severe zone or get the area classified — a guess here invalidates everything after it |
| Gas group | Which gases are present? Any hydrogen or acetylene? | Specify IIC-rated equipment; it covers IIA and IIB gases |
| Temperature class | What is the lowest auto-ignition temperature on site? | Specify T6; it is the strictest and the default safe choice |
| Dust | Is there any combustible dust — grain, flour, metal powder, plastic dust? | Dust needs its own marking (Ex tb / Ex tc); gas-only fittings are not enough |
The zone decides the equipment category you may install; the gas group and temperature class decide which specific fitting is allowed. Our Zone 1 vs Zone 2 guide covers the boundary in detail, including the real cost difference between the two.
Step 2: Match the Protection Concept to the Zone
Once the zone is confirmed, the Ex marking on the fixture is not a matter of preference — the protection level (Gb for Zone 1, Gc for Zone 2) must cover it:
| Your area | Minimum protection level | Typical concepts | Our families that fit |
|---|---|---|---|
| Zone 1 gas | Gb | Ex db (flameproof), Ex db eb mb, Ex d e | FL7, HB21, LO, Bay 51, BT8, BAJ52, BAYD82 |
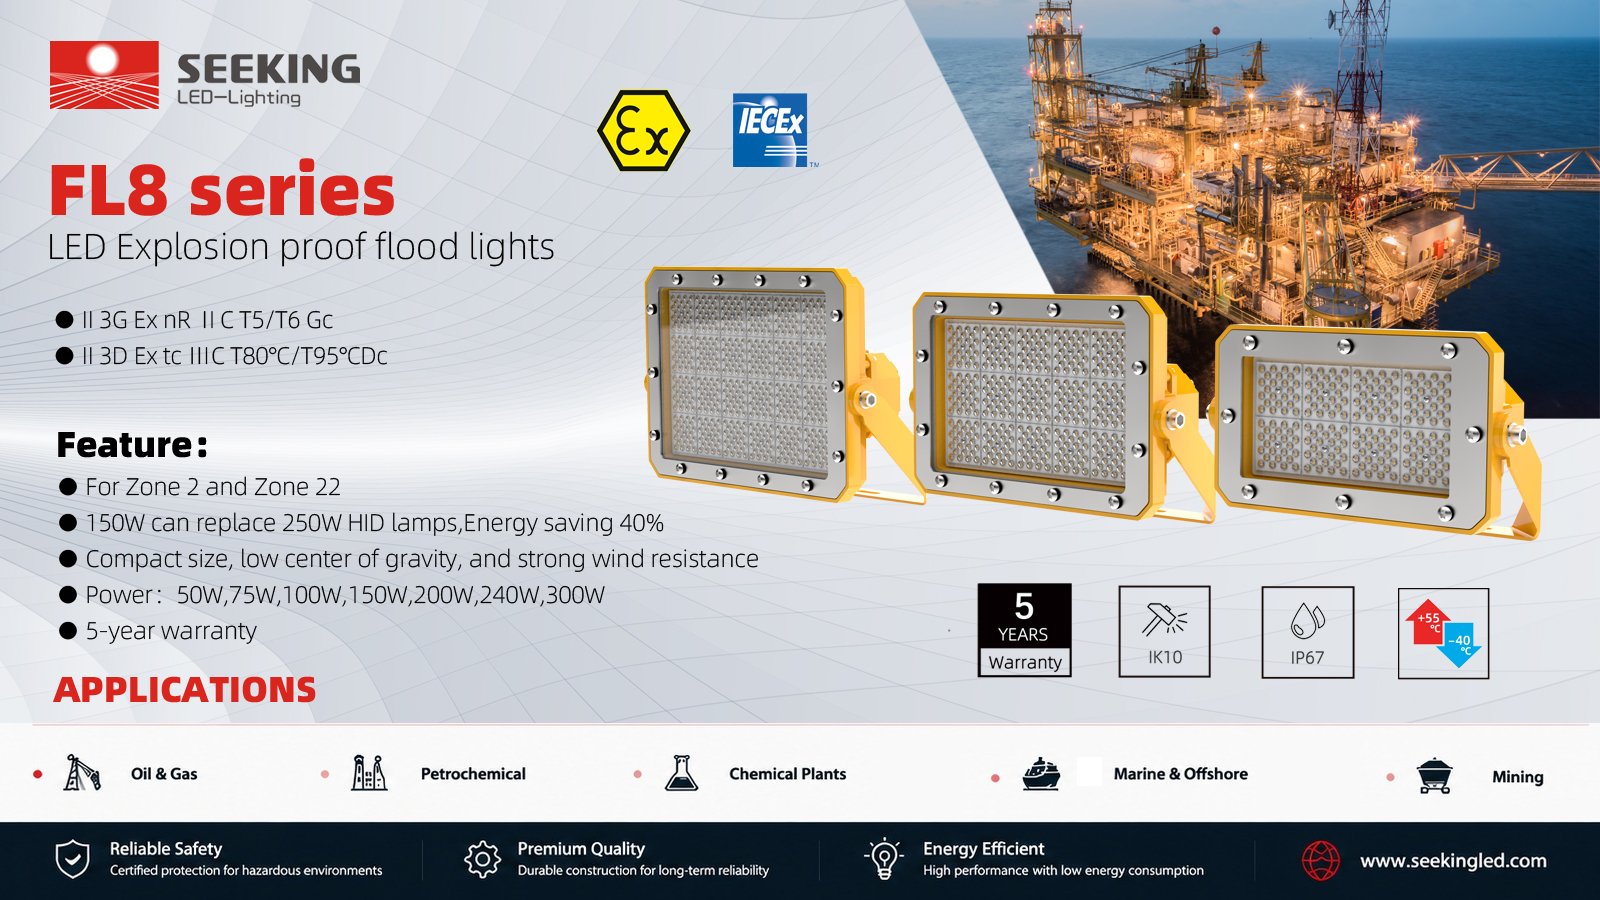
| Zone 2 gas | Gc | Ex nR (restricted breathing), or any Gb fitting | FL8, LU, GS — or any Zone 1 family |
| Zone 21 dust | Db | Ex tb | FL7, HB21, LO, Bay 51, BAJ52, BAYD82 |
| Zone 22 dust | Dc | Ex tc, or any Db fitting | FL8, LU, GS — or any Zone 21 family |
Two notes that prevent the classic mistakes. A Zone 1 (Gb) fitting may always be used in Zone 2 — over-specifying is legal, just usually more expensive. And the gas group travels independently: our Zone 2 flood light is IIC while our Zone 1 flood light is IIB, so "the higher zone must be the better gas rating" is not a rule.
Step 3: Define the Environment, Not Just the Zone
The zone classification says nothing about water, dust density without explosion risk, salt, impact or cold. Those are separate lines on the datasheet, and this is where the fitting either survives fifteen years or becomes a maintenance item:
| Parameter | What to specify | What we build to |
|---|---|---|
| Ingress protection | IP67 for outdoor and washdown; check for dust-heavy indoor areas too | IP67 across the range (BT8 tube: IP33) |
| Impact resistance | IK10 where vehicles, scaffolding or crane loads are realistic | IK10 (20 joules) across the range |
| Corrosion | C4 (ISO 12944) for coastal, offshore and most chemical sites | C4 across the range |
| Ambient temperature | Site minimum and maximum near the mounting position | -20 °C to +55 °C (BHD51 junction box: -60 to +60 °C) |
| Supply voltage | Site nominal and tolerance | AC 100–277 V, 50/60 Hz (portables also DC 24 V) |
| Cable entries | Gland size vs your cable diameter — mismatched glands void the sealing | M20 or M25 nickel-plated brass gland + plug, per model |
Step 4: Run the Lighting Calculation
"Same wattage as before" is not a lighting calculation — especially when converting from HID to LED, where the same watts can mean very different delivered light. The calculation needs: the task area, the mounting height, the target maintained lux, and the photometric file (IES/LDT) of the proposed fitting.
Typical design practice for the areas where our fittings go — treat these as orientation, your project specification governs:
| Area | Typical maintained lux | Notes |
|---|---|---|
| Walkways, stairs, platforms | 50–100 lx | Safety of movement, not task work |
| Pump areas, valve stations | 150–200 lx | Reading gauges and nameplates matters |
| Warehouse aisles (classified) | 100–200 lx | Vertical illuminance on rack faces often decides the result |
| Workshop benches | 300–500 lx | Fine manual work |
| Plant roads, tank perimeters | 10–30 lx | Uniformity matters more than peak level |
Two things worth requiring from the supplier at this step: the delivered luminaire lumens (not the LED chip rating), and the willingness to run the layout for you. A manufacturer with photometric files for every model can return a spacing layout within a day; a reseller cannot.
Step 5: Verify the Paperwork
Before the purchase order, collect and check four documents — not screenshots, the actual items:
- Certificate for the exact model. Number in the issuing body's public register; holder is the manufacturer; marking matches the quotation. Our certification verification guide shows the format.
- Production quality assurance (QAN). Confirms series production is audited — the type certificate alone does not.
- Declaration of Conformity. Links the shipped units to the certified type.
- Installation, operation and maintenance manual. Legal requirement, and the source for gland torques, spare parts and inspection intervals.
Step 6: Plan the Installation and the Maintenance
The last step is the one that happens on site, and it has its own short list:
- Glands and entries. Every unused entry closed with the certified plug; every gland matched to the actual cable diameter. An open or oversized entry defeats the certification.
- Mounting and access. Can the fitting be reached for lens cleaning? At 12 m, the cleaning interval you can actually perform is the one that determines maintained lux.
- Junction boxes counted? Every circuit split inside the classified area needs a certified box — the most commonly forgotten line item.
- Emergency fittings included? Escape routes in classified areas need certified emergency or exit luminaires; order them with the main batch.
- Spares. Glands, gaskets and — where applicable — LED modules, held for the service life you are promising your plant.
The One-Page Checklist
| # | Item | Done when |
|---|---|---|
| 1 | Area classification confirmed (zone / gas group / T-class) | Written classification in hand, not assumed |
| 2 | Protection concept matches zone (Gb for Z1, Gc acceptable Z2) | Ex marking checked character by character |
| 3 | Environment defined (IP / IK / corrosion / ambient / voltage) | Datasheet values meet or beat the site conditions |
| 4 | Lighting calculation done (target lux, mounting height, IES file) | Layout exists with the delivered lumens stated |
| 5 | Paperwork verified (certificate, QAN, DoC, manual) | Certificate numbers resolve in the public register |
| 6 | Installation planned (glands, access, junction boxes, emergency, spares) | Site list includes the fittings nobody photographs |

FAQ
What is the most common specification mistake in hazardous area lighting?
Ordering Zone 2 (Gc) equipment for a Zone 1 area, usually because the purchase order was placed before the area classification was reviewed. It is also the most expensive mistake to discover, because the fittings must be replaced, not modified.
Can I use a Zone 1 fitting in a Zone 2 area?
Yes. Equipment with the higher protection level (Gb) is permitted in the lower zone. It is often more expensive and heavier, so specifying Zone 1 fittings throughout a mixed plant is a deliberate trade-off, not a requirement.
Do I need the area classification drawing before asking for quotes?
You need at least the zone, gas group and temperature class for each area. Without them, no supplier can quote compliant equipment — only guess. A quotation produced without them is a red flag in itself.
What documents must come with each shipment of Ex luminaires?
The declaration of conformity, the certificate copies for the shipped models, and the installation, operation and maintenance manual. For projects, add photometric files and dimensional drawings so the installation contractor is not working from photographs.
How often should hazardous area light fittings be inspected?
Follow the inspection grades in IEC 60079-17 as applied by your site's Ex management system — typically periodic visual and close inspections, with the intervals set by your risk assessment. Cleaning the front lens and checking gland integrity are the two items with the most visible effect on delivered light.
Who is responsible if a non-certified fitting is found in a hazardous area?
In practice, the operator of the installation. The supplier's obligations do not transfer the operator's duty to install correctly classified equipment — which is why the verification steps in this checklist exist and why they are worth the hours they take.
Run the checklist against our range
Send us the six answers — zone, gas group, T-class, environment, target lux and mounting — and we will return the compliant models from our certified range with the certificate numbers, the QAN and the photometric files attached.
Email: sales02@seekingled.com
Tel: +86 755 2984 6615
WhatsApp: +8613418600102
- About Us
- Products
- Explosion proof light
- Portable explosion proof lighting
- Explosion proof emergency light
- Explosion proof LED T8 tube
- Explosion proof Junction Box
- Explosion proof street light
- Service
- FAQ
- Docs download
Service hotline
Tel:+86 755 29846615
Work time:9:00-20:00
E-mail:sales02@seekingled.com
address:5F, Building 5, Guole Science and Technology Park, Lirong Road, Dalang Street, Longhua, Shenzhen, China